iCLuster – Manual
1.General
This Manual can be opened from inside the App or directly using the following link:
http://go-to.me/icluster-manual
If you prefer a printed version, just tap on the PDF Icon on the first page to download a PDF file.
2.About this App
iCluster was my first App on the App Store in 2008, the year when the App Store started.
This version has been completely rewritten, now in Apples new Development language called Swift 3.
I can’t remember how often it has been rewritten in the past almost 10 years.
With every update, there are changes in the user interface and like always, I hope you will get used to the new user interface soon. The old one was quite old-fashioned and some users had their problems with it and some even complained.
This new version has some nice new features (which I already used a lot while testing and in contests) like showing the Spots on a Globe and displaying distance and bearing of a call. It’s also interesting to see the Grayline-DX spots on the Globe.
Settings are now Synchronized via iCloud so you can now easier use multiple devices.
Also, in addition to QRZ.com I added HamQTH call lookup and both have been integrated far better than before.
Like always with brand new versions, there might be bugs or you might miss a certain feature. In either case, please let me know. Like always, I am most interested in receiving your feedback. Please use the support button inside the App for your feedback.
3.Using the App
3.1.Main Screen
After starting the App, the left Main Tab “DX-Cluster” will be selected and you may see an empty screen and the message “Tap Start button to connect”.
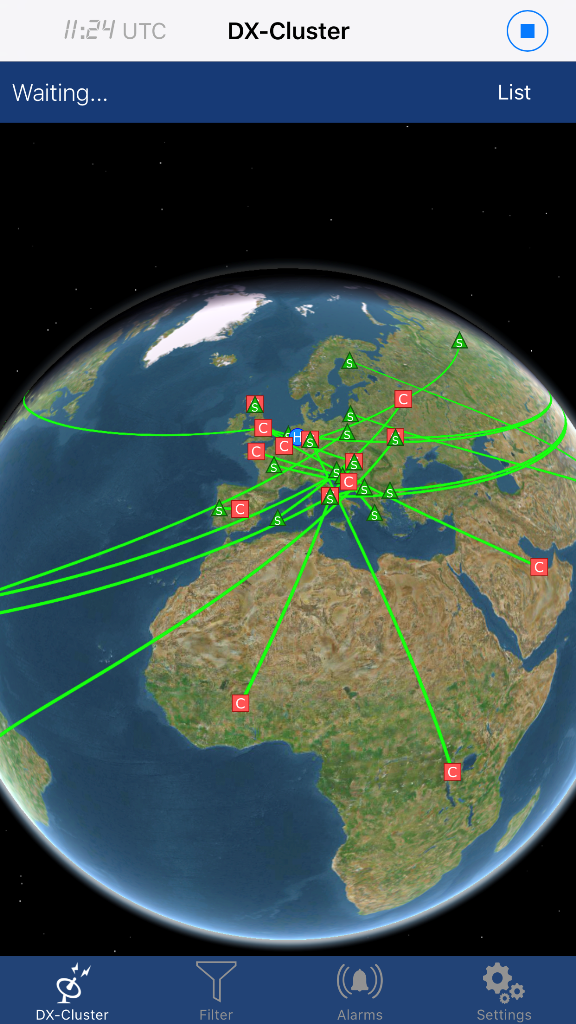
By tapping the Start button, which is the round button in the top right corner, a first query will run on the default DX-Cluster server and after a while, you should see a screen similar to this:

The green lines will appear after a while and indicate new entries that were added since the last DX-Cluster query.
The red lines are lines matching the Alarm criteria. (Please see the next Chapter for an explanation on how to setup Alarms).
This list will be updated automatically according your Settings.
If you like to stop updating, just hit the top right Start button once, and again when you like to continue.
This list is sorted by date and time and all new spots will be displayed at the top. An exception to this are Alarms. Alarms are always on top of the List.
Entries in the list are removed depending on your Settings. If you want to remove old entries manually, just pull the list down and release.
Each line in the List represents one spot in the DX-Cluster database. The Bold Call-Sign is the Call-Sign of the station that has been heard. The other Call-Sign is the Spotter Call-Sign who heard and reported that station.
The line also contains information about each Call like the country as well as the Spot Frequency and Spotters comment.
You can tap on the top right “Map” button to get a Map representation of all Spots in the list:
By tapping a line in the list, you will get more Details:
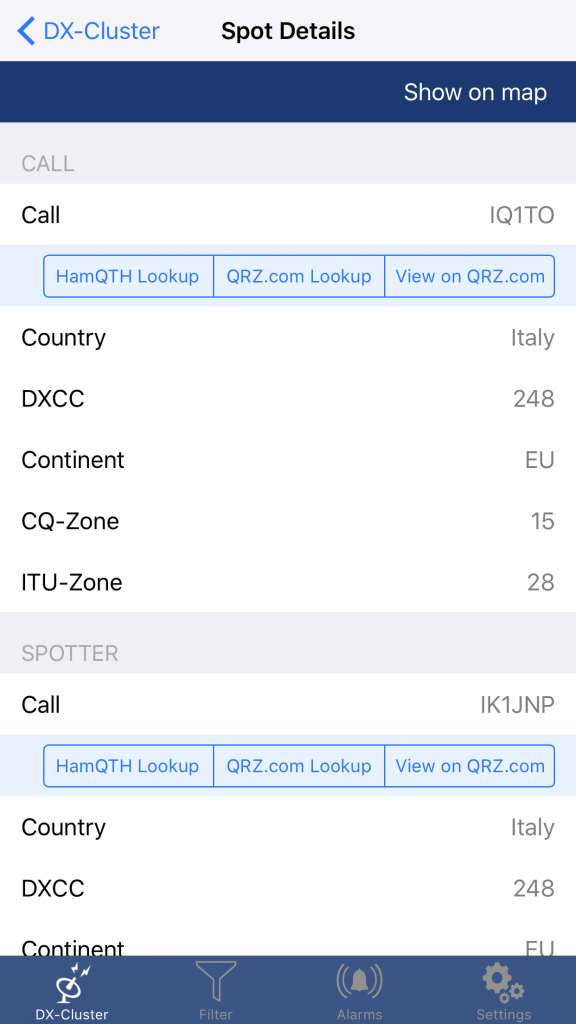
For further details, you can tap on HamQTH or QRZ.com Lookup.
PLEASE NOTE: In order to use these features, you must enter your HamQTH or QRZ.com credentials on the Settings screen of this App.
You can also display more information about the location of a Call and Spot by hitting the “Show on Map” button on top of the Spot Details screen.

At the top, you can see the Distance and Bearing to the Call.
PLEASE NOTE: For this, you need to enter your home QTH Grid location on the Settings screen.
3.2.Filters and Alarms
The Alarms and Filter screens (which can be displayed by hitting the Tap at the bottom) look and can be maintained in a very similar way.
You can set Filters, to reduce the amount of DX-Cluster entries in the List so that entries you are not interested in are not displayed.
In addition, you can set Alarms and let the App highlight and ring a Sound when Spots you are interested in will appear.
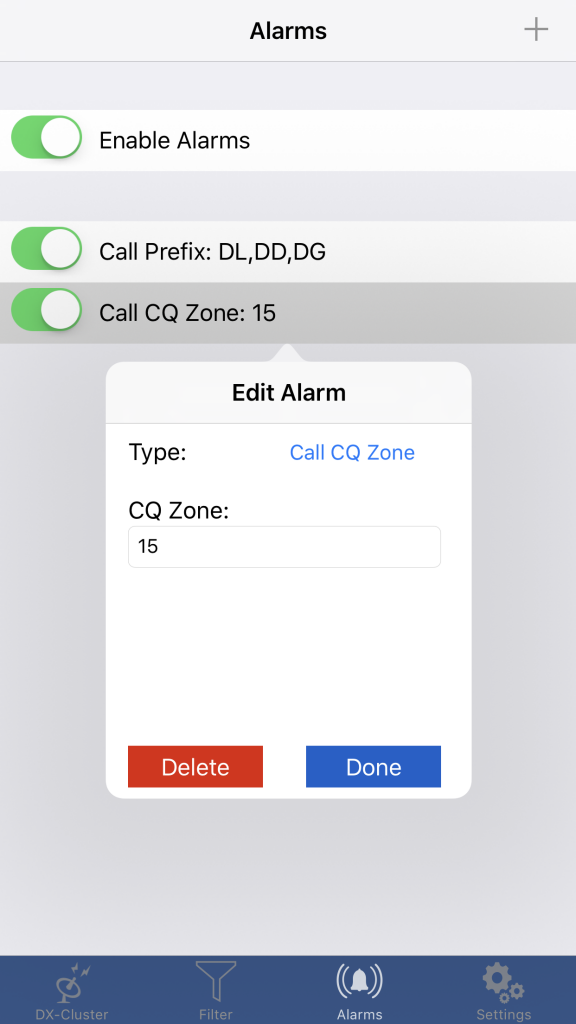
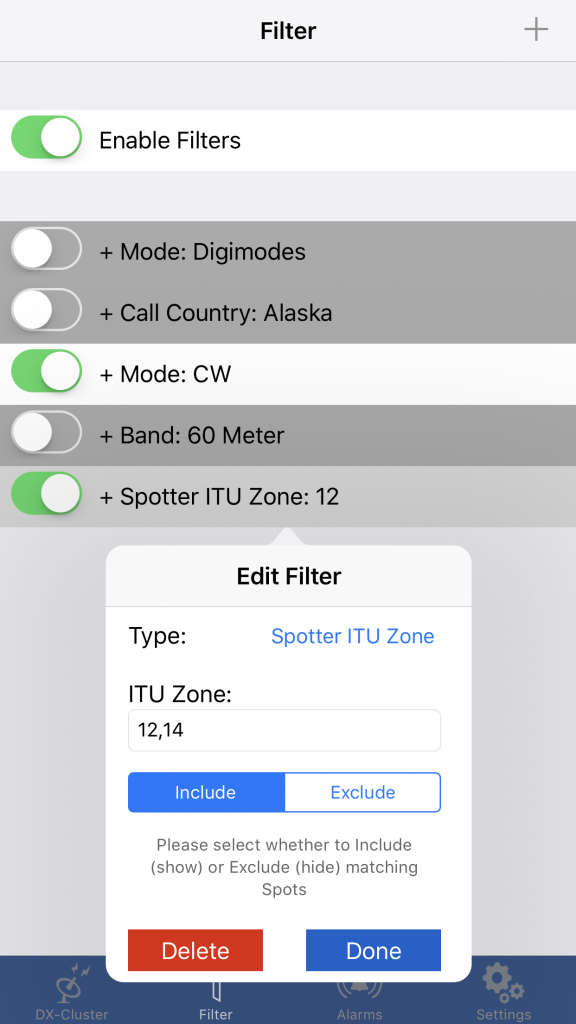
Using the switch at the top, you can quickly enable or disable all Alarms or all Filters.
The entries, further down on the screen are single Alarm or Filter entries which can also be enabled or disabled individually using the switch.
A new Alarm or Filter entry can be added by hitting the + button in the top right corner.
An existing Alarm or Filter can be modified by hitting the entry in the List.
To delete an Alarm or Filter, either slide the entry in the list to the left and confirm or open the Alarm or Filter for editing and hit the red Delete button.
For each Filter entry, you can decide whether Spots matching the criteria should be included (displayed) or excluded (not displayed). You will find the corresponding selection while editing or adding Filters. In the List, call entries that should be included have a + sign on the left side. Entries that should be excluded have a – sign.
When adding or altering Alarms or Filters, you first need to select a Type out of the following choices:
Band, Mode, Comment, Spotter and Call CQ-Zone/ITU-Zone/Prefix/Area and Country.
Next, depending on the Selection, you need to select the Band, Mode or need to enter the CQ-Zone, ITU-Zone etc.
PLEASE NOTE: You can enter multiple Prefixes, CQ-Zones, ITU-Zones etc. by separating each by a comma (,).
Also, even though it is called Prefix, you can enter as many characters as you like that should be used for matching. Even a complete Call-Sign if you like.
Usage tip:
If you like to create complex filters, I would suggest to start by adding include (+) filters, switch all filters off and enable each filter individually to check if each one is working as expected. If that’s the case, add your exclude (-) filters to remove entries you don’t want to see.
3.3.Settings
In the App settings (lower right hand tap), you can change various settings, open this Manual, get Support and check for Data updates.
The first thing I would recommend to do is to enter your IARU Region and Grid (see further below).
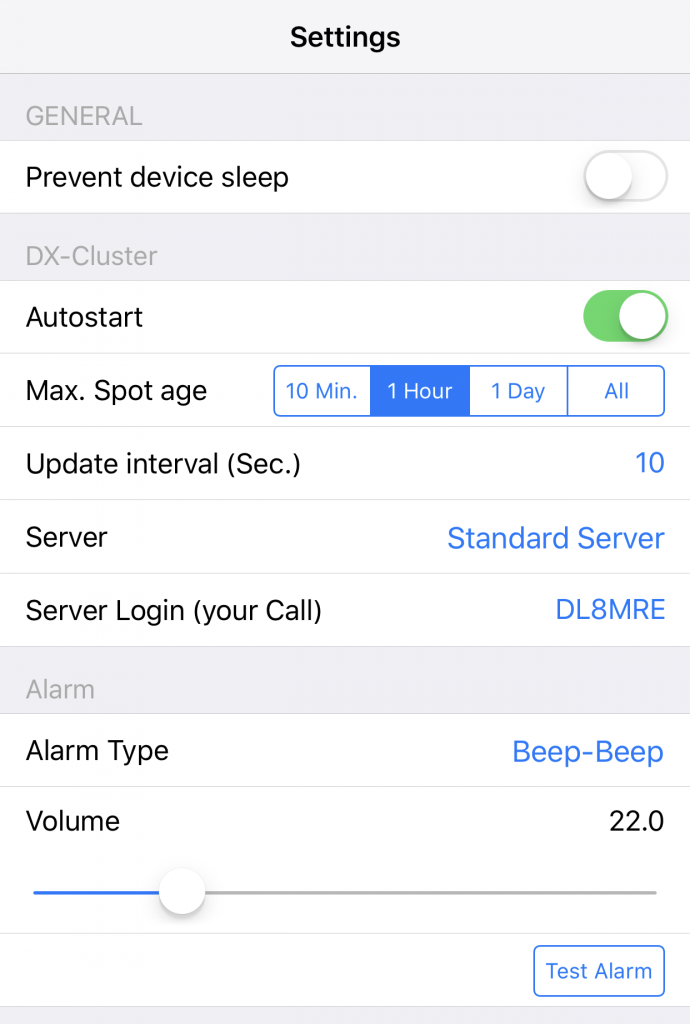
GENERAL
By enabling “Prevent device sleep”, your device will stay switched on all the time and will not shot down, as usual, after a certain time. This allows you to let iCluster run all the time and ring alarms etc.
PLEASE NOTE: This is necessary to let iCluster continuously work as by today, Apple doesn’t allow this kind of App to run in background mode. Please keep in mind that this will DRAIN YOUR BATTERY and is only recommended when your device is connected to a power supply.
DX-CLUSTER
By enabling “Autostart”, the App immediately queries the DX-Cluster database so you no longer have to hit the Start button.
“Max. Spot age” defines, how long an entry should be kept in the list.
“Update Interval” is the time in seconds, a DX-Cluster server will be re-queried.
With “Server” you can select which DX-Cluster Server should be used. iCluster comes with a number of pre-defined Servers. You may want to change to another Server if the Standard Server is not working (e.g. due to maintenance) or you prefer a certain Server, closer to your own location.
You can also add another Server manually.
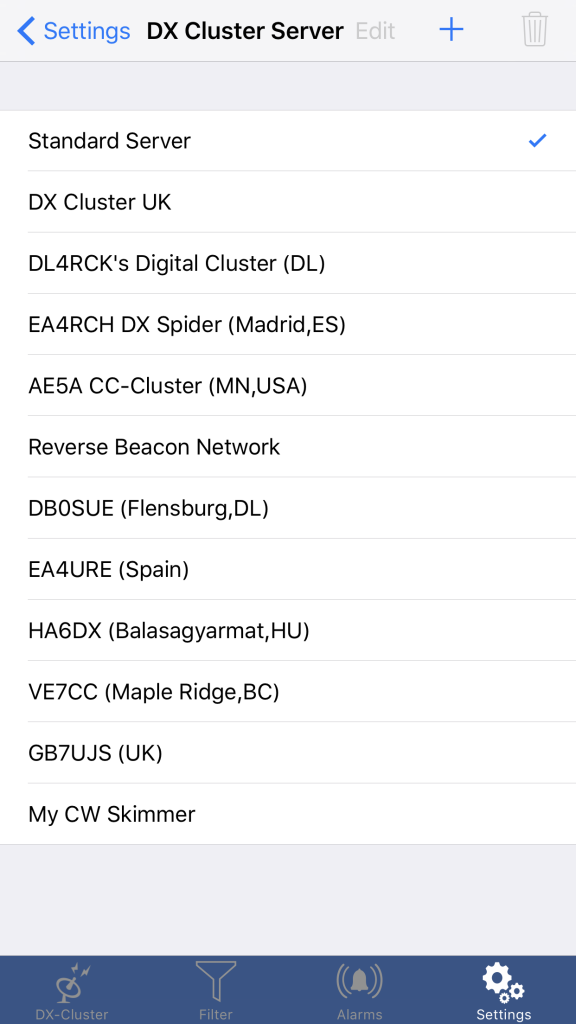
If you hit + at the top, you can add an individual or even your own Server (e.g. CW-Skimmer):
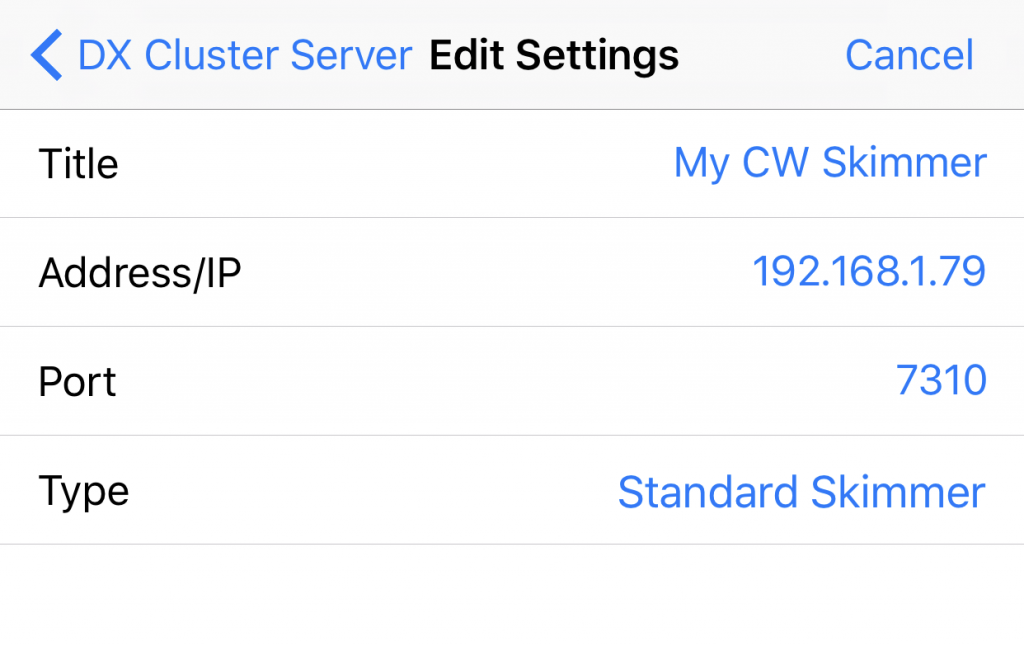
Here, you need to enter a Title, the IP Address (or network address) and the Port. This information is provided by the Server you like to add or, if you like to add your own Server, you will usually maintain these values in the settings of this Server.
If the Server conforms to the regular Skimmer standard, you can select “Standard Skimmer” as type. Otherwise, try one of the other Types.
To modify these settings, just highlight the recently added Server in the list and tap on “Edit” at the top.
PLEASE NOTE: Most Skimmer Servers require a CALL for logging in. For this, you can enter the Call that should be used for login on the main Settings screen below the Server selection.
ALARM
With “Alarm Type”, you can select the sound for the Alarm.
Using the Slider, you can control the volume of the Alarm.
YOUR-INFO
Here you can select your local IARU Region. This will be used for Mode Alarms and Filters to consider the right frequency ranges for the selected Modes for your current location.
In “Grid (QTH Locator)” You can enter your current location in Grid coordinates. This will be used in the Maps to show your current location, distance and bearing.
CALL DATABASES
Calls can be looked up using either HamQTH or QRZ.com. Here you can enter your credentials in order to use these features. After entering your credentials, please use the Test Button to check if the credentials are working.
PLEASE NOTE: For using HamQTH and/or QRZ.com you need an account on each platform. For QRZ.com, in addition, you need an active XML Logbook data subscription (see https://ssl.qrz.com/products/index.html).
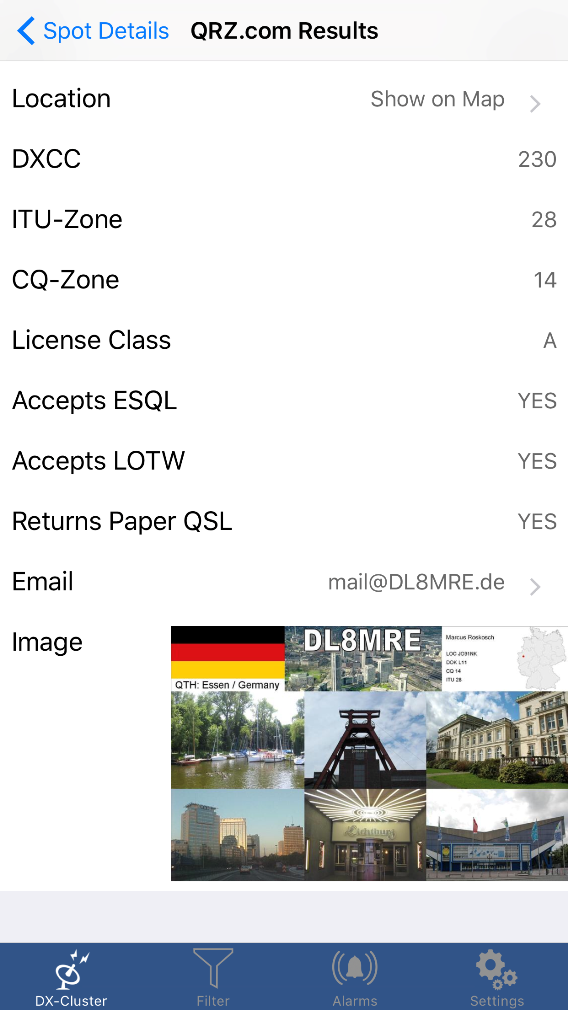
HamQTH and QRZ.com lookup are not only useful to get more detailed information, including pictures, Email addresses etc. They also (when maintained) usually provide more accurate location information.