AOR AR-DV1 Scanner Software – Manual
1.General
This Manual describes how to use the AOR AR-DV1 / AR-DV10 Scanner software.
This manual can be opened from inside the App or directly using the following link: http://go-to.me/aorscanner-manual.
If you prefer a printed version, just click on the PDF Icon on the website version to download a PDF file.
2.Background
Some time ago I purchased the AOR AR-DV1 and was amazed by its features.
Especially the digital decoding capabilities are stunning and now allows me to tune to frequencies were services have nowadays upgraded to digital modes. The sensitivity and everything else also come even close to the professional equipment I am owning which was way more expensive.
The physical interface (knobs and buttons) of this Receiver is perfectly alright for temporary usage but for regular use and longer scanning sessions you will want a PC Software and using a real Keyboard and Mouse.
For this, the AR-DV1 has a USB Interface to connect it to a PC. This was another reason why I bought this Receiver.
However, after purchasing all available Software I was quite disappointed.
One offers a user-interface looking identical to the physical Radio – which makes absolutely no sense at all from my point of view but that software was also missing many important features. Another was full of bugs and so slow that it was a pain to maintain memories and tune to frequencies.
It also seamed that those programs have been developed by people that don’t understand the demands for a modern and powerful scanning software.
So I had to develop my own App for this Receiver and here we are.
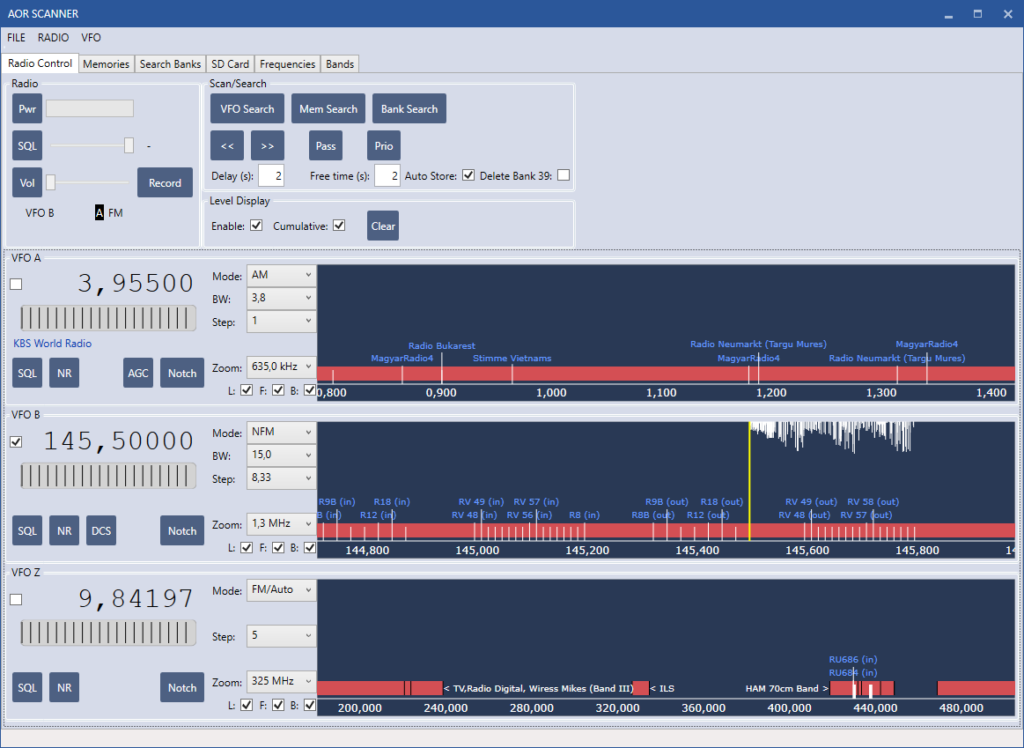
My App has all features all other Apps are providing and allows you to use the full power of this amazing Receiver from your Desktop PC.
In addition and available by no other Software, this App offers feature really needed for serious, convenient and easy scanning such as Band Scopes, predefined Frequency lists and band plans.
Scanning never was easier and more convenient at the same time using this App and the AOR AR-DV1.
If you already purchased my App, thank you so much.
Because I am using the App and the Receiver myself the App and the frequency lists will be continuously updated (for free by the way).
However, if you may find a bug, have questions or suggestions (also for adding frequencies to the lists), please contact me using the HELP Menu inside the App or the form on my ham-radio-apps.com website.
Please also have a look to the Common issues section at the end of this manual.
Thank you!
Best Regards,
Marcus
3.Prerequisites
This App requires at least Firmware version 2101C on your AR-DV1 or 2102A on your AR-DV10 Receiver. Please refer to the AOR Website for details about Firmware version and the update procedure.
Before starting the App, ensure that your AR-DV1 is connected to your PC using the USB Cable that is usually shipped with your Scanner. The USB Connection may also require a driver to be installed from the supplied CD. Please refer to the AOR Manual and AOR Website for further details.
Once the Driver and Cable are installed, a so-called COM Port is assigned to the Receiver. If you don’t know which COM Port has been assigned, open the Windows Device Manager (Right click the Windows Icon in the lower left corner and select Device Manager) then, click on “Ports (COM & LPT)”

“Silicon Labs CP210x” is the name of the driver to be installed for the USB Cable so in this case, the AR-DV1 is using COM5.
Please note: No further Communication settings need to be changed in your Receiver unless you changed the default settings. The Default settings are Receiver ID: 00 and Remote BPS: 115200.
4.Connecting to your AOR AR-DV1 / DV10
Once the prerequisites are met, you can start the App and should see the following Port Selection box:
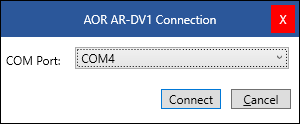
Here you need to select the corresponding COM Port of the USB Cable. After clicking Connect, you should see the main screen of the App like this:
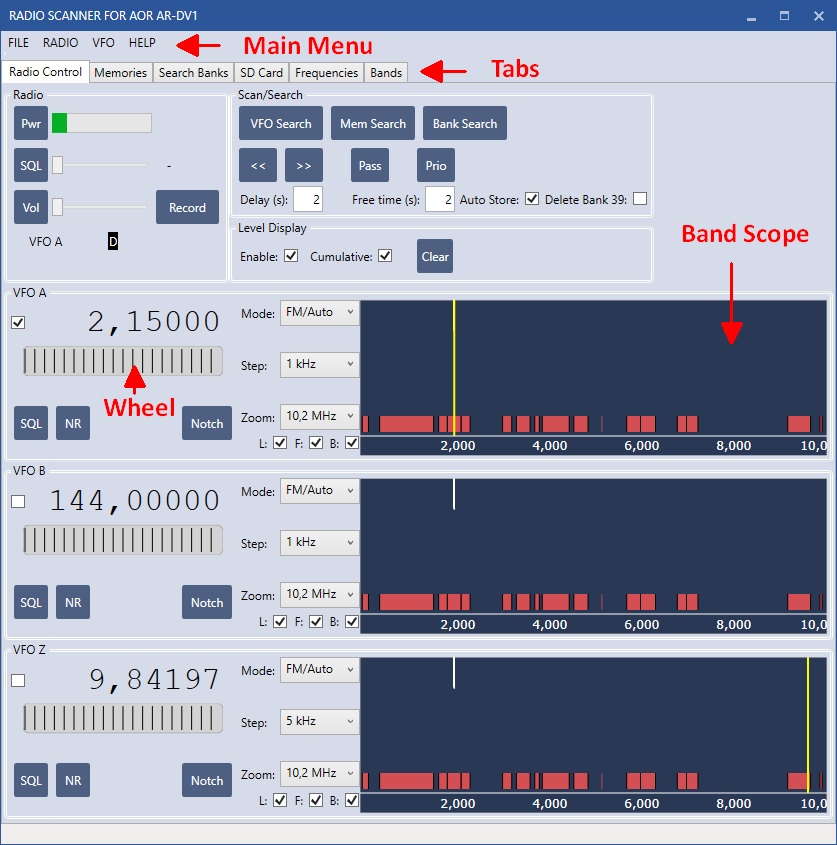
If you don’t see a screen like this or if you get an error message, please check the prerequisites.
6.Tabs
The main screen contains six Tabs (Radio Control, Memories, Search Banks, SD Card, Frequencies and Bands) which can be selected by a simple mouse click.
This selection changes the content of the below displayed part of the screen.
7.Radio Control Tab
This is the main Tab to control your Receiver. It consists of six groups like Radio, Scan/Search, Level Display and VFO A to VFO Z.

Radio Group
The Pwr Button can be used to power cycle the Receiver. Next to this button, the S-Level Meter is being displayed which displays the signal strength.
The SQL Button can be used to temporary (click once) or permanently (click twice) turn off Squelch. The Squelch Level can be changed using the Slider next to the button.
The Vol button can be used to mute the Volume.
Hit the Record Button to record the current Receiver Audio to the SD Card (which needs to be inserted of course). When Recording, the button title will be changed to Stop and now allows to suspend recording.
Below, the currently active VFO and additional information about detected Mode will be displayed.
VFO Groups
There are three similar groups for each of the Receiver VFOs. Here you can change all settings for the corresponding VFO like SQL Type, Noise Reduction (NR), Notch filter settings, Mode, Bandwidth (BW) and Step by hitting the corresponding button or opening the selection box.
The Zoom: and L:, F:, B: selections are for the right blue Band Scope. Zoom allows to select one of the predefined Frequency-Zoom levels. Checking or un-checking L: will show or hide the white Level Display at the top whereas F: shows or hides the Frequency Labels and B: the Band limits in red at the bottom.
Using this part of the screen for Tuning Frequencies is also explained in a separate chapter “Tuning Frequencies”.
To select a certain VFO (make it active) you can either click on the top left Checkbox, the tuning wheel, the frequency or the Band Scope of the VFO.
Scan Search Group
Here you can start one of the three available Scan or Search modes by hitting VFO Search, Mem Search or Bank Search.
Once scanning, these buttons will disappear and a new Button Stop will appear which can be used to stop scanning.
The << and >> buttons can be used to jump to the previous or next frequency either while not scanning or when scanning stopped due to a signal detection.
The Pass button allows to display and clear the Pass Frequencies.
The Prio button allows to enable and maintain the Priority Channel mode.
Use the Auto Store checkbox to let detected frequencies to be store in Bank 39. If Delete Bank 39 is checked, this bank will be cleared before detected frequencies are stored there.
Level Display Group
The Band Scope offers the possibility to display signal strength as small white bars at the top. To enable this feature, just check Enable:.The bars will show the average signal strength unless you check Cumulative which means that bars will stay even if another visit of the same frequency does not have any activity.
This is useful, if you want to scan a certain frequency range over a longer time. This way you can later see if there was any activity at a certain frequency during this time frame.
7.1.Band Scope
The Band Scope is a powerful feature of the App that helps not getting lost on frequencies.
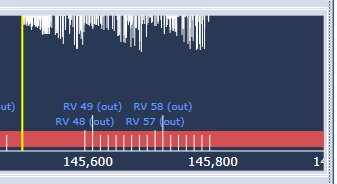
The Band Scope shows
- Frequency at the bottom
- Currently tuned frequency (yellow line)
- Usage of a certain frequency range/band (red bars)
- Channel or usage of a certain frequency (white lines at bottom)
- Signal Level (white bars at top)
Parts of this can be hidden by unchecking one of the three checkboxes left of the Band Scope (L for Level Display, F for frequency display and B for band).
Hiding parts will speed up displaying the Band Scope which is useful for slower PCs.
Please note: To select which Frequencies or Bands to be displayed you need to select a Frequency or Band on the Frequency and Band Tab which is explained in more details later.
Using the Band Scope
The displayed frequency range (left and right frequency limits) of the Band Scope can be changed by simply moving it with the mouse (click and hold the left mouse button on the Band Scope and move the mouse left or right).
To Zoom in or out, you can also use the Mouse by moving the pointer to a frequency on the Band Scope which should stay centered and then by using the mouse wheel.
Alternatively, you can select one of the pre-defined Zoom levels on the left side of the Band Scope.
If there is not enough space available to display the full Band or Frequency information you can use the mouse to hover over a certain band (red bar) or frequency entry (white line) and will see their details.
7.2.Tuning Frequencies
For tuning to a certain Frequency there are several options available:
- By using the Band Scope
Here, you can move the yellow line with your mouse (left click on the line, hold and move the mouse) to tune the frequency accordingly. In addition, you can double click on any location to directly jump to that particular frequency. Double-clicking on a frequency name will jump exactly to that frequency.
- Using the Tuning Wheel
You can scroll the Tuning wheel to the left or right by using the mouse to change the Frequency. In addition, and most conveniently, you can move the mouse pointer to the Tuning Wheel and use the Mouse Scroll wheel for tuning.
- Direct Frequency entering
By double clicking on the displayed Frequency (above the tuning wheel) you can directly enter the Frequency on the following input box.
- Keyboard
If either the Tuning Wheel or Band Scope is Focused (just click on one of these) you can use the left and right buttons at your keyboard to change the frequency. If you hold down the shift key while hitting the left right keys the frequency will be adjusted in larger steps.
For Methods 2 and 4 (Wheel or Keyboard), the currently selected Step is regarded to adjust the frequency upward or downward. Also, the resulting frequency will always be adjusted to a fraction of the Step value.
You can also jump to a certain Frequency from the other Tabs (Memory, Frequencies and Bands) which is explained later.
When right clicking on the displayed Frequency, you can copy/paste a frequency or add a Frequency to a Memory or to a so called “Collected Frequency” file accessible on the Frequencies Tab.
This is useful if you found activity on a certain frequency and want to remember and revisit that frequency at a later time.
8.Memories Tab
By selecting this Tab, you can use or maintain one of the 2000 Memory Channels of your Receiver.
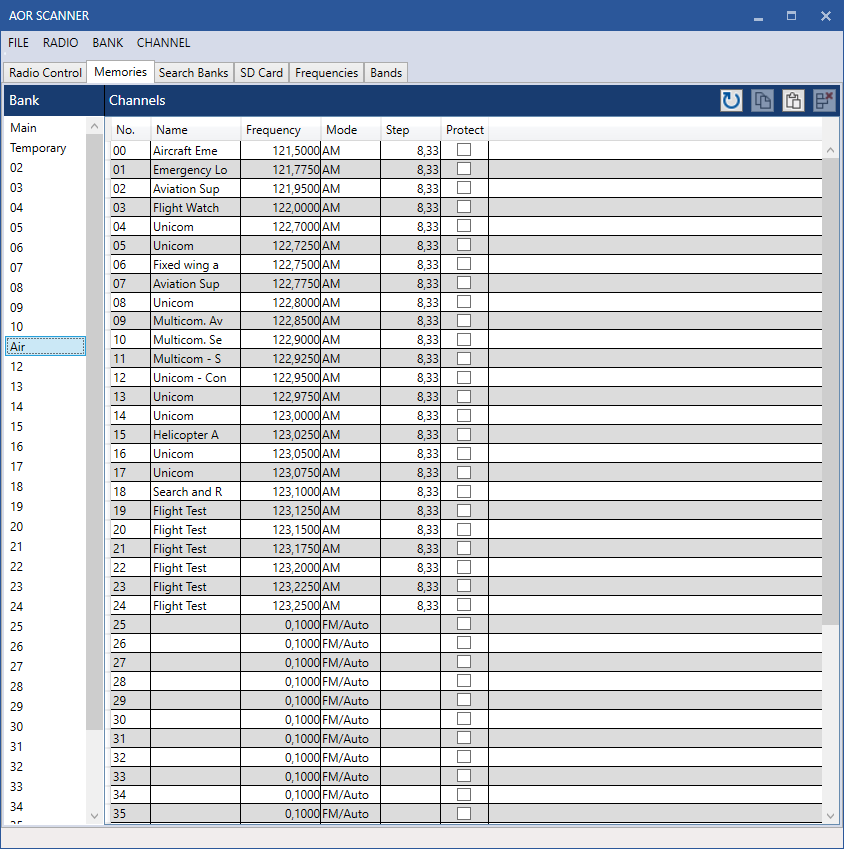
Memories are organized by Banks (00 to 39) and Channels (00 to 49). Each Bank has 50 Channels.
To view and maintain a Channel you first need to select a Bank from the left side of the screen.
You can also name a Bank instead of using the numbers. For this, either right click on the Bank or use the top BANK Menu.
Here, you can also Clear (delete) a Bank or start Memory Scanning.
On the right side you can see and maintain the Channels in a Spreadsheet style. To maintain values, just select a channel (which will highlight the channel with a blue background) then click again on the field you like to alter.
Please note: Clicking too fast one after the other will be recognized as double-click which will cause to tune to that particular Frequency and mode.
You can also copy, paste or delete entries by using the right moue button, the CHANNEL Menu or the Icons on the top-right corner.
Please note: Copy and Paste works across all sections of the App. For instance, you can copy a frequency from either the Frequencies Tab or the Bands Tap and paste it into Memories or vice versa. It is also possible to copy/paste more than one entry by selecting multiple entries (use shift or control when clicking entries).
The right click Menu also offers the possibility to jump to that particular frequency on VFO A, B or Z.
As mentioned earlier, double-clicking will also jump to a frequency as shortcut for VFO A.
Loading a Memory Bank from the Receiver or uploading Memories back to the Receiver takes some time. During this a green progress indicator will be displayed at the bottom of the screen.
9.Search Banks Tab
The AR-DV1 Receiver supports 40 Search Banks (Search Ranges) numbered from 00 to 39.
On the Search Bank tab you can see and maintain each entry in a Spreadsheet style similar to Memory Channels as explained in the previous chapter.
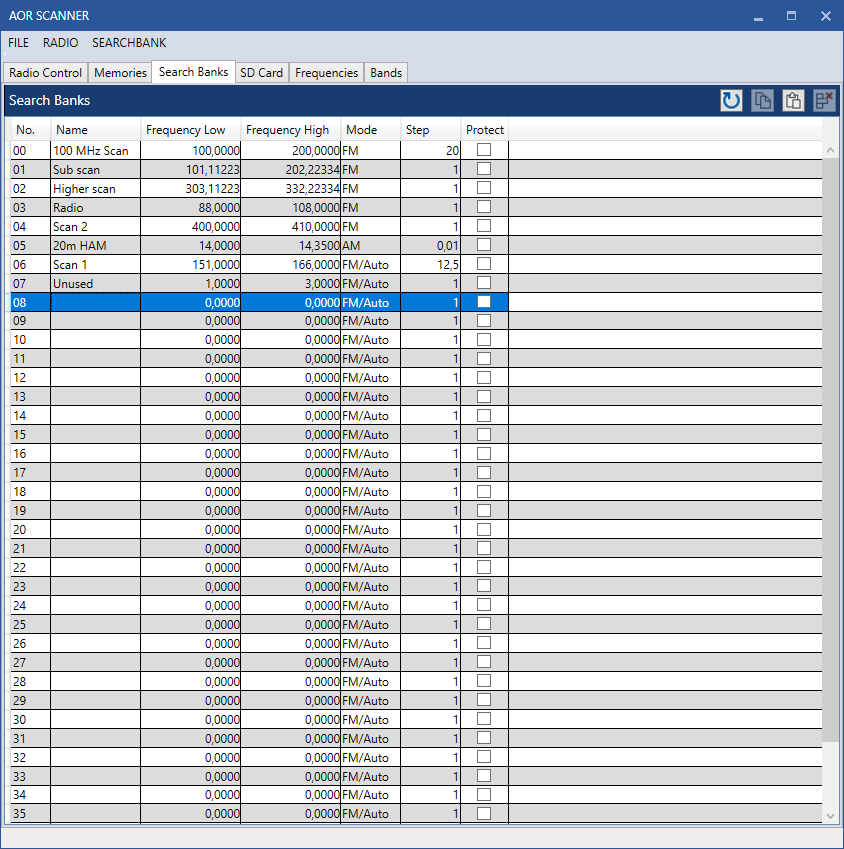
Using the right click Menu, the top SEARCHBANK Menu or the top right Icons you can copy/paste or delete a selected entry or start scanning.
Downloading and updating the Search Banks from and to the Receiver is slower than Memory up and downloading. During this there is also a green progress indicator at the bottom of the screen.
10.SD Card Tab
This Tab displays the content (Files) on the SD Card (if inserted).
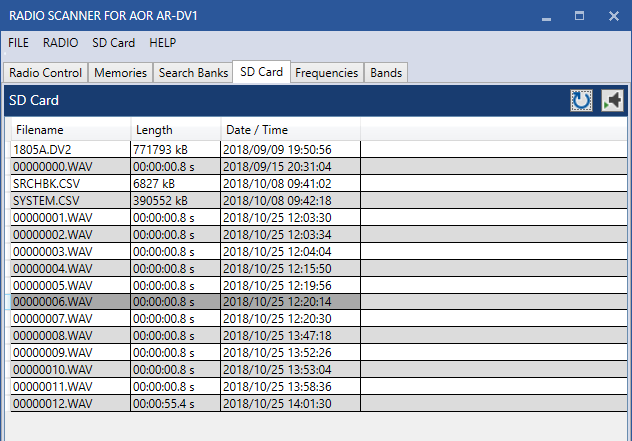
From here, you can playback previously recorded audio by either right clicking on an entry or by using the SD CARD Menu or top left Icons.
Please note: Only WAV files can be played back.
11.Frequencies and Bands
These two Tabs are responsible for the Frequency (white lines) and Band (red boxes) displayed on the Band Scope.

Different to Memories or Search Banks, this information is not stored on the Receiver. Instead it will be maintained using simple csv (semicolon separated text) files located on your PC.
There are several pre-defined files for Frequencies and Bands which can be used straight away. In addition, you can download such files from other sources like radioreference.com or maintain your own files manually from inside the App or your preferred Text editor.
The files are located in two subdirectories under
C:UsersAORScanner
This path can be changed with FILE -> Settings.
Below that path there are two directories (bands and frequencies) where the two different file types are located.
When selecting the Frequencies or Bands Tab, the pre-defined files are displayed in blue color and can not be changed all other files are using a black color.
These files will be updated along with App Updates. Additional files and comments are also available from the App Website (use HELP -> Additional Scanner files… for access).
12.Frequencies Tab
Once selected, you can see all available frequency files on the left side. As mentioned in the previous chapter, pre-defined files are displayed in blue and can not be altered.
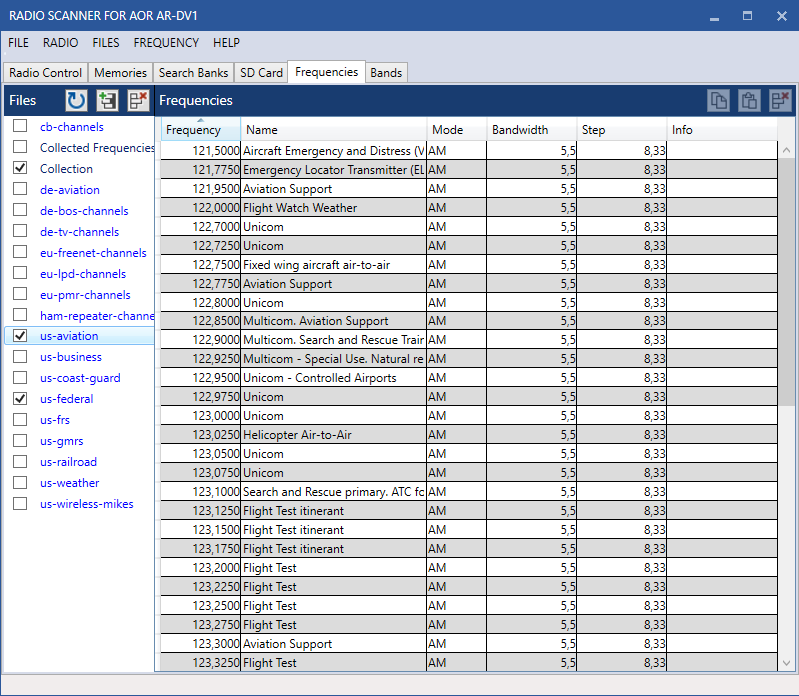
The checkbox left, next to a name, will be used to enable/disable displaying of that file on the Band Scope.
To create a new file, just hit the right mouse key and select Add (or use the FILES Menu or + Icon).
After selecting a file, the content will be displayed on the right side.
From here, you can copy/paste or delete entries. To add a new entry just enter the values in the empty last line.
Similar to Memories and Search Banks, you can edit an entry by first clicking (turn it blue) an entry and click again in the field you like to alter. And similar as well: Don’t click to fast as this will be recognized as double-click and cause to jump to that frequency.
To apply a selected entry to a VFO (e.g. move to that frequency) just select the desired VFO after right clicking the entry or double click that entry which will apply the selection to VFO A as shortcut.
please note: If you hold the ALT key on the keyboard while double-clicking, the entry will also be applied to VFO A but the screen doesn’t switch to the Radio Control tab. This is useful if you just want to check for activity on any of the Frequencies in the list.
Different to Memories, the number of entries here are not limited.
You can also copy/past multiple entries between other parts of the App (e.g. copy multiple Frequencies to Memories or vice versa).
If you add Frequencies from the VFO Frequency (right Click -> Collection) on the Radio Control tab, a new File Collected Frequencies will be generated automatically.
Even though it doesn’t look so, everything displayed here is read out of simple csv files and stored in such files immediately after making changes.
You can also alter these files directly using a Text editor if that’s easier. As mentioned before, you can also copy files from other sources (e.g. radioreference.com) to the C:Users
To re-read files you have manually altered or copied use the Refresh Button or context menu.
The file format can be found in the appendix of this manual.
13.Bands Tab
This section works very similar to the previously explained frequencies tab only that it is meant for maintaining frequency ranges (start frequency and end frequency) instead of single frequency entries.
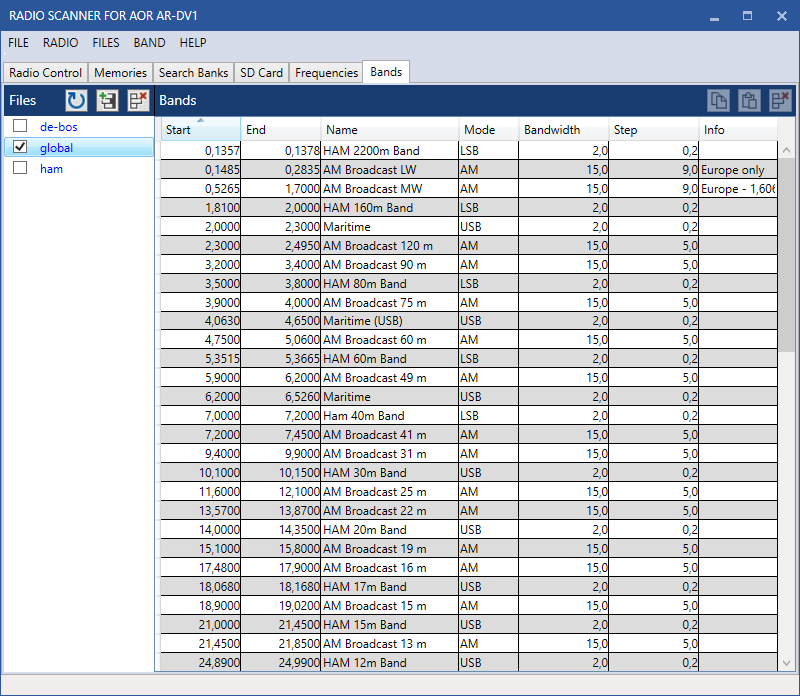
Other than that, maintenance and usage is identical to the frequencies.
When applying an entry to a VFO (right click Menu or double click) the Band Scope will also be zoomed to see the whole frequency range.
From here, you can also start a VFO Scan of that range.
14.Appendix
File Formats:
The frequency and band files are simple UTF-8 Text Files where fields are separated by Semicolon (;). The first line always contains the field titles which can be in any order.
Files from radioreference.com will also be recognized as valid frequency files without necessary modifications.
Decimal points are always dots (.). Commas (,) are not allowed.
See the following examples for the field names and general structure of these files.
Frequency file example:
Frequency;Name;Info;mode;bandwidth;step
121.50000;Aircraft Emergency and Distress (VHF Guard) ;;AM;5.5;8.33
121.95000;Aviation Support;;AM;5.5;8.33
Band file example:
Start;End;Name;Info;mode;bandwidth;step
34.36;35.8;BOS 8m In;Channels 801-873;FM;20;5
38.46;39.84;BOS 8m Out;Channels 801-873;FM;20;5
15.Common issues or frequenlty asked questions
This part of the manual lists commonly asked questions and their answers or possible issues and how to fix them.
This chapter will be updated over time.
Can not connect to the receiver
If you can’t connect to the Receiver, please double check the Prerequisites mentioned at the beginning of this manual.
Also, please check if this App is not already running and is already connected to the Receiver.
Everything is very slow and sluggish
Maybe your PC is not fast enough but don’t worry. Try to disable displaying too much at the same time by unchecking the L:, F: and B: checkboxes next to the Band Scope for each VFO on the Radio Control tab and uncheck all Frequencies and Bands on the Frequencies and Band Tabs.
If this helps, you can try to re-check everything step by step to see which one slows down your PC.
I can’t hear anything
The AOR AR-DV1 doesn’t provide audio data over the USB Cable so that it can be heard using the PC. Audio still only comes out of the Radio speaker. If you can’t hear anything, please double check the Volume (maybe muted) and Squelch settings.
I like to see a real spectrum scope instead of the level display lines at the top.
The AOR AR-DV1 doesn’t provide audio data over the USB Cable. The only activity information available to this App is the level meter value which is displayed on the Band Scope.
The frequency displayed in the App while scanning is not updated as fast as the Radio.
The data interface between the App and the Receiver over the USB cable is limited to 115200 baud which is fast enough to control the Receiver and to update frequency display in the App every few 50 milliseconds. But the Radio itself is much faster than the interface. While scanning, the AR-DV1 shines with a very fast scanning speed but the frequency of the App seems to skip a few frequencies. But in fact, all frequencies are indeed being scanned and once there is activity on a frequency, the right frequency will be displayed inside the App.
I can’t use the physical knobs of the Receiver anymore, even not the on/off switch.
As long as the App is connected to the Receiver, only the Volume knob of the Receiver can be used.
To re-enable the physical knobs, just disconnect to the Receiver (RADIO -> Disconnect).
If you still can’t use the knobs, just hit the ENT button of the Receiver and all other knobs should be enabled again.
